Linux Kernel 2.6 using KAME-tools
This chapter explains the usage of the native IPsec stack of the Linux Kernel ≥2.5.47 and 2.6.*. The installation and the configuration of this IPsec stack differs greatly from FreeS/WAN and is similar to the *BSD variants like FreeBSD, NetBSD and OpenBSD.
I will first cover the configuration and installation of the Linux kernel and the user space tools. Then the setup of a manually keyed connection in transport and tunnel mode will be explained. Finally we will cover the setup of automatically keyed connections using preshared keys and X.509 certificates. The support of roadwarriors will be explained last.
Installation
The installation requires at least a Linux kernel of version 2.5.47 or 2.6.*. The kernel source may be downloaded at http://www.kernel.org. After downloading the source the kernel source package must be extracted, configured and compiled.
cd /usr/local/src
tar xvjf /path-to-source/linux-<version>.tar.bz2
cd linux-<version>
make xconfig
make bzImage
make modules
make modules_install
make install
|
These are the most often used commands to configure and compile the Linux kernel. If you need a special setup please refer to the Kernel-Howto.
When configuring the kernel, it is important, to turn on the following features:
Networking support (NET) [Y/n/?] y
  *
  * Networking options
  *
  PF_KEY sockets (NET_KEY) [Y/n/m/?] y
  IP: AH transformation (INET_AH) [Y/n/m/?] y
  IP: ESP transformation (INET_ESP) [Y/n/m/?] y
  IP: IPsec user configuration interface (XFRM_USER) [Y/n/m/?] y

Cryptographic API (CRYPTO) [Y/n/?] y
  HMAC support (CRYPTO_HMAC) [Y/n/?] y
  Null algorithms (CRYPTO_NULL) [Y/n/m/?] y
  MD5 digest algorithm (CRYPTO_MD5) [Y/n/m/?] y
  SHA1 digest algorithm (CRYPTO_SHA1) [Y/n/m/?] y
  DES and Triple DES EDE cipher algorithms (CRYPTO_DES) [Y/n/m/?] y
  AES cipher algorithms (CRYPTO_AES) [Y/n/m/?] y
|
Depending on the version of the kernel used you might have to turn on IPv6 support too.
Once the kernel is compiled and installed the user space tools may be installed. Currently the tools are maintained at http://ipsec-tools.sourceforge.net/. When compiling the package by hand you may need to specify the location of the kernel headers. This package needs the kernel headers of at least kernel version 2.5.47.
Attention: When using Linux kernel >= 2.6.10 you must use the ipsec-tools >=0.5 because this kernel added a new forward policy unknown to racoon in the older ipsec-tools. Be aware that some Linux distributions heavily patch even older Linux kernels so this may apply to you, too. Just check for fwd policies in your kernel.
./configure --with-kernel-headers=/lib/modules/2.6.X/build/include
make
make install
|
Now everything should be ready to go.
Manual keyed connections using setkey
A manual keyed connection means that all parameters needed for the setup of the connection are provided by the administrator. The IKE protocol is not used to automatically authenticate the peers and negotiate these parameters. The administrator decides which protocol, algorithm and key to use for the creation of the security associations and populates the security association database (SAD) accordingly.
Transport Mode
This section will first cover the setup of a manual keyed connection in transport mode. This is probably the best way to start because it is the simplest connection to setup. This section assumes that two machines with the IP addresses 192.168.1.100 and 192.168.2.100 communicate using IPsec.
All parameters stored in the SAD and the SPD can be modified using the setkey command. This command has a quite exhaustive man page. Therefore only the options needed for the setup of a connection in transport mode are covered here. setkey reads its commands from a file when invoked with setkey -f /etc/setkey.conf. A suitable /etc/setkey.conf file is shown in following listing.
#!/usr/sbin/setkey -f

# Configuration for 192.168.1.100

# Flush the SAD and SPD
flush;
spdflush;

# Attention: Use this keys only for testing purposes!
# Generate your own keys!

# AH SAs using 128 bit long keys
add 192.168.1.100 192.168.2.100 ah 0x200 -A hmac-md5
0xc0291ff014dccdd03874d9e8e4cdf3e6;
add 192.168.2.100 192.168.1.100 ah 0x300 -A hmac-md5
0x96358c90783bbfa3d7b196ceabe0536b;

# ESP SAs using 192 bit long keys (168 + 24 parity)
add 192.168.1.100 192.168.2.100 esp 0x201 -E 3des-cbc
0x7aeaca3f87d060a12f4a4487d5a5c3355920fae69a96c831;
add 192.168.2.100 192.168.1.100 esp 0x301 -E 3des-cbc
0xf6ddb555acfd9d77b03ea3843f2653255afe8eb5573965df;

# Security policies
spdadd 192.168.1.100 192.168.2.100 any -P out ipsec
           esp/transport//require
           ah/transport//require;

spdadd 192.168.2.100 192.168.1.100 any -P in ipsec
           esp/transport//require
           ah/transport//require;
|
You will need some keys to replace the keys of this script, if you want to use the manually keyed connection for anything but testing purposes. Use a command such as the following to generate your keys:
$ # 128 Bit long key $ dd if=/dev/random count=16 bs=1| xxd -ps 16+0 Records ein 16+0 Records aus cd0456eff95c5529ea9e918043e19cbe $ # 192 Bit long key $ dd if=/dev/random count=24 bs=1| xxd -ps 24+0 Records ein 24+0 Records aus 9d6c4a8275ab12fbfdcaf01f0ba9dcfb5f424c878e97f888 |
Please use the device /dev/random when generating the keys because it ensures random keys.
The script first flushes the security association database (SAD) and the security policy database (SPD). It then creates AH SAs and ESP SAs. The command add adds a security association to the SAD and requires the source and destination IP address, the IPsec protocol (ah), the SPI (0x200) and the algorithm. The authentication algorithm is specified with -A (encryption using -E, compression using -C; IP compression is not yet supported). Following the algorithm the key must be specified. The key may be formatted in double-quoted “ASCII” or in hexadecimal with a leading 0x.
Linux supports the following algorithms for AH and ESP: hmac-md5 and hmac-sha, des-cbc and 3des-cbc. Within a short amount of time the following algorithms will probably be supported: simple (no encryption), blowfish-cbc, aes-cbc, hmac-sha2-256 and hmac-sha2-512.
spdadd adds the security policies to the SPD. These policies define which packets are to be protected by IPsec and which protocols and keys to use. The command requires the source and destination IP addresses of the packets to be protected, the protocol (and port) to protect (any) and the policy to use (-P). The policy specifies the direction (in/out), the action to apply (ipsec/discard/none), the protocol (ah/esp/ipcomp), the mode (transport) and the level (use/require).
This configuration file has to be created on both peers taking part in the IPsec communication. While the shown listing works without any change on the peer 192.168.1.100 it has to be slightly modified on the peer 192.168.2.100 to reflect the change of direction of the packets. The easiest way to do it is to exchange the directions in the security policies: replace -P in with -P out and vice versa. This is shown in the following listing:
#!/usr/sbin/setkey -f

# Configuration for 192.168.2.100

# Flush the SAD and SPD
flush;
spdflush;

# Attention: Use this keys only for testing purposes!
# Generate your own keys!

# AH SAs using 128 bit long keys
add 192.168.1.100 192.168.2.100 ah 0x200 -A hmac-md5
0xc0291ff014dccdd03874d9e8e4cdf3e6;
add 192.168.2.100 192.168.1.100 ah 0x300 -A hmac-md5
0x96358c90783bbfa3d7b196ceabe0536b;

# ESP SAs using 192 bit long keys (168 + 24 parity)
add 192.168.1.100 192.168.2.100 esp 0x201 -E 3des-cbc
0x7aeaca3f87d060a12f4a4487d5a5c3355920fae69a96c831;
add 192.168.2.100 192.168.1.100 esp 0x301 -E 3des-cbc
0xf6ddb555acfd9d77b03ea3843f2653255afe8eb5573965df;

# Security policies
spdadd 192.168.1.100 192.168.2.100 any -P in ipsec
           esp/transport//require
           ah/transport//require;

spdadd 192.168.2.100 192.168.1.100 any -P out ipsec
           esp/transport//require
           ah/transport//require;
|
Once the configuration file is in place on the peers it can be loaded using setkey -f /etc/setkey.conf. The successful load can be tested by displaying the SAD and the SPD:
# setkey -D # setkey -DP |
The setup resembles now the setup of Figure 4.
If you now ping from one peer to the other the traffic will be encrypted and tcpdump will show the following packets:
12:45:39.373005 192.168.1.100 > 192.168.2.100: AH(spi=0x00000200,seq=0x1): ESP(spi=0x00000201,seq=0x1) (DF) 12:45:39.448636 192.168.2.100 > 192.168.1.100: AH(spi=0x00000300,seq=0x1): ESP(spi=0x00000301,seq=0x1) 12:45:40.542430 192.168.1.100 > 192.168.2.100: AH(spi=0x00000200,seq=0x2): ESP(spi=0x00000201,seq=0x2) (DF) 12:45:40.569414 192.168.2.100 > 192.168.1.100: AH(spi=0x00000300,seq=0x2): ESP(spi=0x00000301,seq=0x2) |
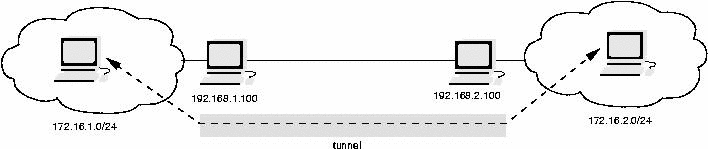
Tunnel Mode
Tunnel mode is used when the two peers using IPsec work as a gateway and protect the traffic between two networks (Figure 5). The original IP packets are encrypted and encapsulated by one gateway and transfered to it's peer. The peer will decapsulate the packet and will pass on the original unprotected packet.
The configuration of the security associations and policies for the tunnel mode is similar to the transport mode and is shown in the following listing.
#!/usr/sbin/setkey -f

# Flush the SAD and SPD
flush;
spdflush;

# ESP SAs doing encryption using 192 bit long keys (168 + 24 parity)
# and authentication using 128 bit long keys
add 192.168.1.100 192.168.2.100 esp 0x201 -m tunnel -E 3des-cbc
0x7aeaca3f87d060a12f4a4487d5a5c3355920fae69a96c831
-A hmac-md5 0xc0291ff014dccdd03874d9e8e4cdf3e6;

add 192.168.2.100 192.168.1.100 esp 0x301 -m tunnel -E 3des-cbc
0xf6ddb555acfd9d77b03ea3843f2653255afe8eb5573965df
-A hmac-md5 0x96358c90783bbfa3d7b196ceabe0536b;

# Security policies
spdadd 172.16.1.0/24 172.16.2.0/24 any -P out ipsec
           esp/tunnel/192.168.1.100-192.168.2.100/require;

spdadd 172.16.2.0/24 172.16.1.0/24 any -P in ipsec
           esp/tunnel/192.168.2.100-192.168.1.100/require;
|
Attention: When using the Linux kernel >= 2.6.10 you also have to define the forward policy if packets need to be fowarded by the box. Just make sure you use the ipsec-tools 0.5 which add this policy automatically or add it yourself if using older tools. If you are running setkey in Kernel-mode (-k) you have to add the fwd-policy manually, too.
spdadd 172.16.2.0/24 172.16.1.0/24 any -P fwd ipsec
           esp/tunnel/192.168.2.100-192.168.1.100/require;
|
This example uses only the ESP protocol. The ESP protocol can ensure integrity and confidentiality. In this case the order of the ESP algorithms is important. First you need to define the encryption algorithm and its key and secondly the authentication algorithm and its key.
For the peer of the tunnel you have to copy this file and to replace the direction of the policies (in vs. out). If you are using a forward policy, you have to additionally reverse the directions of the IP addresses.
In contrast to the BSD IPsec implementation a security association on Linux can only be used for either transport or tunnel mode. Transport mode is the default mode, so whenever tunnel mode is desired, the security association has to be defined with -m tunnel.
The security policies now specify the IP addresses of the protected networks. Packets using these source and destination IP addresses shall be protected by IPsec. Whenever the tunnel mode is used the security policy must specify tunnel and the IP addresses of the actual peers doing implementing the protection. This information is needed to find the appropiate IPsec SA.
If you tunnel is not working, please check your routing. Your hosts need to know that they should send the packets for the opposite network to you vpn gateway. The easiest setup would be using your vpn gateway as default gateway.
Automatic keyed connections using racoon
The KAME IKE daemon racoon has also been ported to Linux. This daemon is able to setup automatically keyed IPsec connections. Racoon supports the authentication using preshared keys, X.509 certificates and Kerberos. The daemon can use main mode, aggressive mode and base mode in phase one of IKE. This chapter will show the configuration of racoon in main mode using preshared keys and X.509 certificates (ToDo: Kerberos). At the end the configuration of a roadwarrior scenario will be briefly explained.
Remember: If you are using the Linux kernel 2.6.10 (or a heavily patched 2.6.9 by your distribution) you need the ipsec-tools 0.5.
Preshared Keys
The easiest way to authenticate using racoon is the usage of preshared keys. These keys have to be defined in a file /etc/psk.txt. This file should not be read by unprivileged users (chmod 400 /etc/psk.txt) and has the following syntax:
# IPv4 Adressen 192.168.2.100 simple psk 5.0.0.1 0xe10bd52b0529b54aac97db63462850f3 # USER_FQDN ralf@spenneberg.net This is a psk for an email address # FQDN www.spenneberg.net This is a psk |
This file is organized in columns. The first column holds the identity of the peer authenticated by the psk. Everything starting in the second column is the PSK.
The configuration of racoon is straightforward. The following listing shows a typical /etc/racoon.conf configuration file:
path pre_shared_key "/etc/psk.txt";

remote 192.168.2.100 {
        exchange_mode main;
        proposal {
                encryption_algorithm 3des;
                hash_algorithm md5;
                authentication_method pre_shared_key;
                dh_group modp1024;
        }
}

sainfo address 172.16.1.0/24 any address 172.16.2.0/24 any {
        pfs_group modp768;
        encryption_algorithm 3des;
        authentication_algorithm hmac_md5;
        compression_algorithm deflate;
}
|
This configuration file first defines where racoon may find the preshared keys. It then defines a peer 192.168.2.100 and the parameters to use for the phase one of the IKE negotiation. The second paragraph specifies the parameters which may be used for the setup of the security associations. This definition may be specific for defined IP addresses or general using anonymous instead of the IP addresses. Here the encryption, authentication and compression algorithms to use for the SA are defined. All three need to be defined to avoid an error during the startup of racoon.
The IKE daemon racoon does not start the tunnel negotiation immediately when started. Rather racoon waits until the tunnel is needed. For this notification to occur the kernel needs to know when to notify racoon. To achieve this, the administrator needs to define security policies without the appropiate security associations. Whenever the Linux kernel needs to protect a packet according to the security policies and when no security association is available, the Linux kernel calls racoon and asks for the required security associations. Racoon will then start the IKE negotiations and will create the SAs when finished. The Linux kernel can then send the packets.
For the assumed setup the following policies are needed on 192.168.1.100:
#!/usr/sbin/setkey -f
#
# Flush SAD and SPD
flush;
spdflush;

# Create policies for racoon
spdadd 172.16.1.0/24 172.16.2.0/24 any -P out ipsec
           esp/tunnel/192.168.1.100-192.168.2.100/require;

spdadd 172.16.2.0/24 172.16.1.0/24 any -P in ipsec
           esp/tunnel/192.168.2.100-192.168.1.100/require;
|
Once the policies are loaded using setkey -f /etc/setkey.conf racoon may be started. For testing purposes racoon should be started using racoon -F -f /etc/racoon.conf. Again the configuration of the other peer has to be modified to reflect the different direction. The IP addresses in the files /etc/psk.txt, /etc/setkey.conf and /etc/racoon.conf must be exchanged.
The initiation of the tunnel can then be followed in the logs:
2003-02-21 18:11:17: INFO: main.c:170:main(): @(#)racoon 20001216 20001216 sakane@kame.net 2003-02-21 18:11:17: INFO: main.c:171:main(): @(#)This product linked Open SSL 0.9.6b [engine] 9 Jul 2001 (http://www.openssl.org/) 2003-02-21 18:11:17: INFO: isakmp.c:1365:isakmp_open(): 127.0.0.1[500] use d as isakmp port (fd=7) 2003-02-21 18:11:17: INFO: isakmp.c:1365:isakmp_open(): 192.168.1.100[500] used as isakmp port (fd=9) 2003-02-21 18:11:37: INFO: isakmp.c:1689:isakmp_post_acquire(): IPsec-SA r equest for 192.168.2.100 queued due to no phase1 found. 2003-02-21 18:11:37: INFO: isakmp.c:794:isakmp_ph1begin_i(): initiate new phase 1 negotiation: 192.168.1.100[500]<=>192.168.2.100[500] 2003-02-21 18:11:37: INFO: isakmp.c:799:isakmp_ph1begin_i(): begin Identit y Protection mode. 2003-02-21 18:11:37: INFO: vendorid.c:128:check_vendorid(): received Vendor ID: KAME/racoon 2003-02-21 18:11:37: INFO: vendorid.c:128:check_vendorid(): received Vendor ID: KAME/racoon 2003-02-21 18:11:38: INFO: isakmp.c:2417:log_ph1established(): ISAKMP-SA es tablished 192.168.1.100[500]-192.168.2.100[500] spi:6a01ea039be7bac2:bd288f f60eed54d0 2003-02-21 18:11:39: INFO: isakmp.c:938:isakmp_ph2begin_i(): initiate new p hase 2 negotiation: 192.168.1.100[0]<=>192.168.2.100[0] 2003-02-21 18:11:39: INFO: pfkey.c:1106:pk_recvupdate(): IPsec-SA establish ed: ESP/Tunnel 192.168.2.100->192.168.1.100 spi=68291959(0x4120d77) 2003-02-21 18:11:39: INFO: pfkey.c:1318:pk_recvadd(): IPsec-SA established: ESP/Tunnel 192.168.1.100->192.168.2.100 spi=223693870(0xd554c2e) |
X.509 Certificates
Racoon supports the usage of X.509 certificates for the authentication process. These certificates may be checked against a certificate authority (CA). The configuration is similar to the PSK configuration and differs only on the authentication part:
path certificate "/etc/certs";

remote 192.168.2.100 {
        exchange_mode main;
        certificate_type x509 "my_certificate.pem" "my_private_key.pem";
	verify_cert on;
        my_identifier asn1dn;
	peers_identifier asn1dn;
        proposal {
                encryption_algorithm 3des;
                hash_algorithm md5;
                authentication_method rsasig;
                dh_group modp1024;
        }
}

sainfo address 172.16.1.0/24 any address 172.16.2.0/24 any {
        pfs_group modp768;
        encryption_algorithm 3des;
        authentication_algorithm hmac_md5;
        compression_algorithm deflate;
}
|
The certificate and the private key are stored in the certificate path /etc/certs. This path is set using the option path certificate in the configuration file. The certificates and the certificate revocation lists are stored in PEM format as generated with openssl. For the generation of certificates see the chapter on X.509 certificates. If the certificate of the peer is to be checked against a certificate authority (verify_cert on; is the default), then the certificate of the CA has to be also stored in this directory. For OpenSSL to find the certificate it has to be renamed or linked using the hashed name:
ln -s CAfile.pem `openssl x509 -noout -hash < CAfile.pem`.0 |
If the certificate additionally is to be checked against a certificate revocation file (CRL) the CRL must be stored in the same directory using a similar linked hashed name:
ln -s CRLfile.pem `openssl x509 -noout -hash < CAfile.pem`.r0 |
When storing the certificates and the private key it is important to note that racoon cannot decrypt a private key. Therefore the private key must be stored in its decrypted cleartext form. If you created a crypted private key, you have to decrypt it:
# openssl rsa -in my_private_key.pem -out my_private_key.pem read RSA key Enter PEM pass phrase: password writing RSA key |
Roadwarrior
Roadwarriors are clients using unknown dynamic IP addresses to connect to a VPN gateway. In combination with racoon this poses two problems:
The IP address is not known and cannot be specified in the racoon configuration file or in the /etc/psk.txt file. A different way to determine the identity of the client must be found. When using pre-shared keys this requires the aggressive mode! The best solution is the usage of X.509 certificates though.
No security policy can be created for racoon to act on, since the destination IP address is not known. racoon must create the security policy and the security association when the connection is initiated.
To achieve this the configuration file /etc/racoon.conf needs several modifications:
path certificate "/etc/certs";

remote anonymous {
        exchange_mode main;
        generate_policy on;
        passive on;
        certificate_type x509 "my_certificate.pem" "my_private_key.pem";
        my_identifier asn1dn;
        peers_identifier asn1dn;
        proposal {
                encryption_algorithm 3des;
                hash_algorithm md5;
                authentication_method rsasig;
                dh_group modp1024;
        }
}


sainfo anonymous {
        pfs_group modp1024;
        encryption_algorithm 3des;
        authentication_algorithm hmac_md5;
        compression_algorithm deflate;
}
|
The option generate_policy on instructs racoon to create the appropriate policy when a new connection is initiated. The option passive on tells racoon to remain passive and wait for new connection to be started from the outside. racoon may not start a connection.
The most important change though is the definition of anonymous in the remote and sainfo line. This instructs racoon to accept the connection from anywhere.
NAT-Traversal
The Linux kernel 2.6 is capable of using NAT traversal in tunnel mode. Transport mode is not supported yet. This can be used by Racoon starting with version 0.3.3 of the ipsec-tools.
To configure Racoon for NAT traversal several options have been added to the configuration file. These are natt_keepalive, isakmp_natt, nat_traversal.
The most important option is nat_traversal. This can be set to on, off or force. When set to on this peer will use NAT traversal as soon as a NAT device is detected on the path. Off will disable this behavior. When using force NAT traversal will be used regardless wether a NAT device is found or not.
Since many NAT devices forget the entries in their internal tables quite fast when no traffic is seen, racoon offers to send keepalive packets across the wire. These are send every 20 seconds by default. You can change this value using natt_keepalive. Setting this to 0 seconds will disable this feature.
If you want to use NAT traversal you have to specify the IP address and the port to use in the listen section of the racoon configuration file. This is done using isakmp_natt.
For clarity a typical configuration file is shown, where the peer 192.168.2.100 is hidden by a NAT gateway with the IP address 192.168.1.1:
path pre_shared_key "/etc/psk.txt";

timer  {
       natt_keepalive 10sec;
       }

listen {
       isakmp 192.168.1.100 [500];
       isakmp_natt 192.168.1.100 [4500];
       }

remote 192.168.1.1 {
        exchange_mode main;
        nat_traversal on;
        proposal {
                encryption_algorithm 3des;
                hash_algorithm md5;
                authentication_method pre_shared_key;
                dh_group modp1024;
        }
}

sainfo address 172.16.1.0/24 any address 172.16.2.0/24 any {
        pfs_group modp768;
        encryption_algorithm 3des;
        authentication_algorithm hmac_md5;
        compression_algorithm deflate;
}
|
If you configured everything correctly NAT will be detected automatically:
2004-12-22 07:34:53: INFO: @(#)ipsec-tools 0.4 (http://ipsec-tools.sourceforge.net)
2004-12-22 07:34:53: INFO: @(#)This product linked OpenSSL 0.9.7a Feb 19 2003 (http://www.openssl.org/)
2004-12-22 07:34:53: INFO: 192.168.1.100[4500] used as isakmp port (fd=6)
2004-12-22 07:34:53: INFO: 192.168.1.100[4500] used for NAT-T
2004-12-22 07:34:53: INFO: 192.168.1.100[500] used as isakmp port (fd=7)
2004-12-22 07:35:09: INFO: respond new phase 1 negotiation: 192.168.1.100[500]<=>192.168.1.1[500]
2004-12-22 07:35:09: INFO: begin Identity Protection mode.
2004-12-22 07:35:09: INFO: received Vendor ID: draft-ietf-ipsec-nat-t-ike-02
2004-12-22 07:35:09: INFO: received Vendor ID: RFC XXXX
2004-12-22 07:35:09: INFO: Selected NAT-T version: RFC XXXX
2004-12-22 07:35:09: INFO: Hashing 192.168.1.100[500] with algo #1
2004-12-22 07:35:09: INFO: NAT-D payload #0 verified
2004-12-22 07:35:09: INFO: Hashing 192.168.1.1[500] with algo #1
2004-12-22 07:35:09: INFO: NAT-D payload #1 doesn't match
2004-12-22 07:35:09: INFO: NAT detected: PEER
2004-12-22 07:35:10: INFO: Hashing 192.168.1.1[500] with algo #1
2004-12-22 07:35:10: INFO: Hashing 192.168.1.100[500] with algo #1
2004-12-22 07:35:10: INFO: Adding remote and local NAT-D payloads.
2004-12-22 07:35:10: INFO: NAT-T: ports changed to: 192.168.1.1[4500]<->192.168.1.100[4500]
2004-12-22 07:35:10: INFO: KA list add: 192.168.1.100[4500]->192.168.1.1[4500]
2004-12-22 07:35:10: INFO: ISAKMP-SA established 192.168.1.100[4500]-192.168.1.1[4500] spi:0613dc09c4ccc828:9cc9dfc9acc82eb5
2004-12-22 07:35:11: INFO: respond new phase 2 negotiation: 192.168.1.100[0]<=>192.168.1.1[0]
2004-12-22 07:35:11: INFO: Adjusting my encmode UDP-Tunnel->Tunnel
2004-12-22 07:35:11: INFO: Adjusting peer's encmode UDP-Tunnel(3)->Tunnel(1)
2004-12-22 07:35:11: INFO: IPsec-SA established: ESP/Tunnel 192.168.1.1->192.168.1.100 spi=95762109(0x5b536bd)
2004-12-22 07:35:11: INFO: IPsec-SA established: ESP/Tunnel 192.168.1.100->192.168.1.1 spi=222871470(0xd48bfae)
|
When looking at the packets on the wire you will see UDP traffic traversing back and forth:
[root@bibo root]# tcpdump
tcpdump: verbose output suppressed, use -v or -vv for full protocol decode
listening on tap1, link-type EN10MB (Ethernet), capture size 96 bytes
13:37:41.920621 IP 192.168.1.1.isakmp > 192.168.1.100.isakmp: isakmp: phase 1 I iden
t
13:37:41.941296 IP 192.168.1.100.isakmp > 192.168.1.1.isakmp: isakmp: phase 1 R iden
t
13:37:42.051826 IP 192.168.1.1.isakmp > 192.168.1.100.isakmp: isakmp: phase 1 I iden
t
13:37:42.157134 IP 192.168.1.100.isakmp > 192.168.1.1.isakmp: isakmp: phase 1 R iden
t
13:37:42.353942 IP 192.168.1.1.4500 > 192.168.1.100.4500: UDP, length 72
13:37:42.361530 IP 192.168.1.100.4500 > 192.168.1.1.4500: UDP, length 72
13:37:42.373799 IP 192.168.1.1.4500 > 192.168.1.100.4500: UDP, length 88
13:37:43.374630 IP 192.168.1.100.4500 > 192.168.1.1.4500: UDP, length 1
13:37:43.384476 IP 192.168.1.1.4500 > 192.168.1.100.4500: UDP, length 256
13:37:43.431219 IP 192.168.1.100.4500 > 192.168.1.1.4500: UDP, length 256
13:37:43.436680 IP 192.168.1.1.4500 > 192.168.1.100.4500: UDP, length 56
13:37:44.492976 IP 192.168.1.1.4500 > 192.168.1.100.4500: UDP, length 1
13:37:45.390137 IP 192.168.1.1.4500 > 192.168.1.100.4500: UDP, length 116
13:37:45.390612 IP 192.168.1.100.4500 > 192.168.1.1.4500: UDP, length 116
13:37:46.395603 IP 192.168.1.1.4500 > 192.168.1.100.4500: UDP, length 116
13:37:46.396009 IP 192.168.1.100.4500 > 192.168.1.1.4500: UDP, length 116
|
If you are using your Racoon not in a roadwarrior setup but with fixed addresses as above you need to modify your Security Policies too. These need to reflect the natted addresses! The correct Policies for the above scenario are:
#!/usr/sbin/setkey -f
#
# Flush SAD and SPD
flush;
spdflush;

# Create policies for racoon
spdadd 172.16.1.0/24 172.16.2.0/24 any -P out ipsec
           esp/tunnel/192.168.1.100-192.168.1.1/require;

spdadd 172.16.2.0/24 172.16.1.0/24 any -P in ipsec
           esp/tunnel/192.168.1.1-192.168.1.100/require;
|
These policies are automatically setup if you use generate_policy on; in your Racoon configuration.